


無料で使えるオンライン画像編集ツール!Photopeaの使い方をご紹介
用意するもの

それでは「archive.php」と「single.php」の作成をしていきましょう。今回のファイルは2つとも記述が長いですが、重要なポイントだけ押さえていってもらえればと思います。
特に「single.php」は投稿記事を表示する大事なファイルです。内部SEOも考慮した構造でHTMLをマークアップしていますので、タグの記述も併せてご確認ください。
こちらの「デモサイト」から実際のページを確認して頂けます。
各カテゴリーの記事を一覧表示する「archive.php」を作成していきます。ココでは「search.php」の作成時に説明を省略した「その他の記事」の出力方法を見ていきましょう。
archive.php
- <?php get_header(); ?>
- <main>
- <div class="breadcrumbWrap">
- <ol itemscope="" itemtype="https://schema.org/BreadcrumbList">
- <li itemscope="" itemtype="https://schema.org/ListItem" itemprop="itemListElement">
- <a itemprop="item" href="<?php echo esc_url(get_home_url()); ?>">
- <img src="<?php bloginfo('template_url'); ?>/img/icon_home.svg" alt="">
- <span itemprop="name">ホーム</span>
- </a>
- <meta itemprop="position" content="1">
- </li>
- <li itemscope="" itemtype="https://schema.org/ListItem" itemprop="itemListElement">
- <span itemprop="name"><?php $cat = get_the_category(); $cat = $cat[0]; { echo $cat->cat_name; } ?></span>
- <meta itemprop="position" content="2">
- </li>
- </ol>
- </div>
- <div class="mainInner">
- <div id="mainContents" class="mainContents">
- <section id="category">
- <div class="title">
- <h1><?php $cat = get_the_category(); $cat = $cat[0]; { echo $cat->cat_name; } ?></h1>
- </div>
- <div class="inner">
- <div class="postWrap">
- <?php while (have_posts()) : the_post();?>
- <article>
- <a href="<?php the_permalink(); ?>">
- <figure class="thumbnail">
- <?php if(has_post_thumbnail()) { echo the_post_thumbnail(); } ?>
- </figure>
- <div class="txt">
- <h2 itemprop="headline"><?php echo get_the_title(); ?></h2>
- </div>
- </a>
- </article>
- <?php endwhile; ?>
- </div>
- <div class="paginationWrap">
- <?php wp_pagination(); ?>
- </div>
- </div>
- </section>
- <div class="recommend">
- <div class="title">
- <h2>その他の記事</h2>
- </div>
- <div class="postWrap">
- <?php
- $args = array(
- 'post_type' => 'post',
- 'posts_per_page' => 6,
- 'orderby' => 'rand'
- );
- $the_query = new WP_Query($args);
- while ($the_query->have_posts()) : $the_query->the_post();
- ?>
- <article>
- <a href="<?php the_permalink(); ?>">
- <figure class="thumbnail">
- <?php if(has_post_thumbnail()) { echo the_post_thumbnail(); } ?>
- </figure>
- <div class="txt">
- <h3 itemprop="headline"><?php echo get_the_title(); ?></h3>
- <div class="cattegory">
- <p><?php $cat = get_the_category(); $cat = $cat[0]; { echo $cat->cat_name; } ?></p>
- </div>
- </div>
- </a>
- </article>
- <?php endwhile; ?>
- </div>
- </div>
- </div>
- <?php get_sidebar(); ?>
- </div>
- </main>
- <?php get_footer(); ?>
こちらもコピペしておいてください。コードは長いですが、半分は今まで見てきた内容のものです。まだ説明していない箇所と言えば「その他の記事」の項目だけですね。
- <?php
- $args = array(
- 'post_type' => 'post',
- 'posts_per_page' => 6,
- 'orderby' => 'rand'
- );
- $the_query = new WP_Query($args);
- while ($the_query->have_posts()) : $the_query->the_post();
- ?>
- ・
- ・
- ・
- <?php endwhile; ?>
「その他の記事」では上記のPHPを記述しています。「・・・」の箇所には一覧表示と同じように「article」タグが記述されていますので、中身の内容は理解してもらえると思います。
上記のコードの意味をザックリ言うと、「6件の記事をランダムで一覧表示する」という事です。記事を一覧で表示する際にはいろいろな設定を加える事ができるんです。
「’post_type’ => ‘post’」で投稿記事を指定、「’posts_per_page’ => 6」で6件表示を指定、そして「’orderby’ => ‘rand’」でランダム表示を指定しています。

それでは「その他の記事」のデザインも「style.css」に追加していきます。ココの内容も今までおこなってきた設定とほぼほぼ同じなのでサクッとコピペしておきましょう。
style.css
- ~テーマ情報省略~
- ~共通デザイン省略~
- ~main・パンくず・mainContents省略~
- ~ヘッダー・フッター省略~
- ~サイドバー・記事一覧・検索結果省略~
- ~エラーページ省略~
- /* ------ recommend ------ */
- .recommend { margin-top: 60px }
- .recommend h2 {
- font-size: 2.4rem;
- font-weight: 300;
- padding-bottom: 10px;
- border-bottom: 1px solid #c1c1c1
- }
- .recommend .postWrap {
- font-size: 0;
- margin-top: 40px
- }
- .recommend article {
- width: 100%;
- max-width: 50%;
- vertical-align: top;
- padding: 0 15px 30px;
- display: inline-block
- }
- .recommend article a { display: block }
- .recommend article figure img { transition: all 0.3s ease-in-out }
- .recommend article a:hover figure img { opacity: 0.7 }
- .recommend article .txt {
- padding: 10px 20px 20px;
- background: #fff
- }
- .recommend article h3 {
- font-size: 1.6rem;
- font-weight: 300;
- text-align: left
- }
- .recommend article .cattegory p {
- font-size: 1.3rem;
- text-align: left;
- margin-top: 6px;
- }
- @media screen and (max-width: 768px) {
- .recommend { margin-top: 40px }
- .recommend h2 { font-size: 2rem }
- .recommend .postWrap {
- padding: 20px 10px;
- margin-top: 20px;
- background: #fff
- }
- .recommend article {
- max-width: 100%;
- padding: 0;
- display: block
- }
- .recommend article + article {
- padding: 20px 0 0;
- margin-top: 20px;
- border-top: 1px dashed #c1c1c1
- }
- .recommend article a { font-size: 0 }
- .recommend article figure {
- width: 100px;
- vertical-align: top;
- margin-right: 10px;
- display: inline-block
- }
- .recommend article .txt {
- width: calc(100% - 110px);
- vertical-align: top;
- padding: 0 10px;
- display: inline-block
- }
- .recommend article h3 {
- font-size: 1.5rem;
- margin-top: 0
- }
- .recommend article .cattegory p { margin-top: 0 }
- }
「index.php」「search.php」「archive.php」で表示されるループ部分はどれも同じデザインです。「その他の記事」も同じように記事が1行に2列並んで表示されています。
もし記事の表示を1行3列や1行4列に変更されたい場合は、ご自身でカスタマイズしてみてください。個人的にサンプルブログはベースとして使ってもらって、どんどんデザインや機能を追加していってもらえると嬉しいです。
ちなみに記事の表示を1行3列にするなら、「article」の「max-width」プロパティの値を「calc(100% / 3)」とすればOKです。同じく1行4列にするなら値を「25%」に変更します。
簡単ですねぇ、せっかくなので「calc」の説明をすると、「calc」のうしろの「()」山括弧には計算式を記述する事ができます。「calc(100% / 3)」というのは「100%を3で割った数値」という意味です。
3で割った数値を指定すると「33.333333333333%」みたいになりますが、正確には3で割った値に満たない数値になります。なので、そんな時には「calc」を使うのが便利です。
続いて「single.php」を作成していきますので、下記のコードをコピペしておいてください。投稿記事の部分には条件分岐を設定していますが、必要なければ外してもらって結構です。
single.php
- <?php get_header(); ?>
- <main>
- <div class="breadcrumbWrap">
- <ol itemscope="" itemtype="https://schema.org/BreadcrumbList">
- <li itemscope="" itemtype="https://schema.org/ListItem" itemprop="itemListElement">
- <a itemprop="item" href="<?php echo esc_url(get_home_url()); ?>">
- <img src="<?php bloginfo('template_url'); ?>/img/icon_home.svg" alt="">
- <span itemprop="name">ホーム</span>
- </a>
- <meta itemprop="position" content="1">
- </li>
- <li itemscope="" itemtype="https://schema.org/ListItem" itemprop="itemListElement">
- <?php
- $cat = get_the_category();
- $cat_id = $cat[0]->cat_ID;
- $link = get_category_link($cat_id);
- ?>
- <a itemprop="item" href="<?php echo $link; ?>">
- <span itemprop="name"><?php $cat = get_the_category(); $cat = $cat[0]; { echo $cat->cat_name; } ?></span>
- </a>
- <meta itemprop="position" content="2">
- </li>
- <li itemscope="" itemtype="https://schema.org/ListItem" itemprop="itemListElement">
- <span itemprop="name"><?php the_title(); ?></span>
- <meta itemprop="position" content="3">
- </li>
- </ol>
- </div>
- <div class="mainInner">
- <div id="mainContents" class="mainContents">
- <section id="post">
- <div class="inner">
- <article>
- <?php if (have_posts()) : ?>
- <?php while (have_posts()) : the_post(); ?>
- <header id="entryHeader">
- <figure class="entryThumbnail">
- <div class="thumbnail">
- <a href="<?php the_permalink(); ?>" title="<?php the_title(); ?>">
- <span itemprop="image">
- <?php if(has_post_thumbnail()) { echo the_post_thumbnail(); } ?>
- </span>
- </a>
- </div>
- </figure>
- <ul>
- <li>最終更新日 <time><?php the_modified_date('Y.m.j'); ?></time></li>
- <li><?php $cat = get_the_category(); $cat = $cat[0]; { echo $cat->cat_name; } ?></li>
- </ul>
- <h1><?php the_title(); ?></h1>
- </header>
- <div class="entryContent">
- <?php the_content(); ?>
- </div>
- <?php endwhile; ?>
- <?php else : ?>
- <div class="entryContent">
- <p>記事が見つかりませんでした。</p>
- </div>
- <?php endif; ?>
- </article>
- </div>
- </section>
- <div class="recommend">
- <div class="title">
- <h2>その他の記事</h2>
- </div>
- <div class="postWrap">
- <?php
- $args = array(
- 'post_type' => 'post',
- 'posts_per_page' => 6,
- 'orderby' => 'rand',
- 'post__not_in' => array(get_the_ID())
- );
- $the_query = new WP_Query($args);
- while ($the_query->have_posts()) : $the_query->the_post();
- ?>
- <article>
- <a href="<?php the_permalink(); ?>">
- <figure class="thumbnail">
- <?php if(has_post_thumbnail()) { echo the_post_thumbnail(); } ?>
- </figure>
- <div class="txt">
- <h3 itemprop="headline"><?php echo get_the_title(); ?></h3>
- <div class="cattegory">
- <p><?php $cat = get_the_category(); $cat = $cat[0]; { echo $cat->cat_name; } ?></p>
- </div>
- </div>
- </a>
- </article>
- <?php endwhile; ?>
- </div>
- </div>
- </div>
- <?php get_sidebar(); ?>
- </div>
- </main>
- <?php get_footer(); ?>
長いですけどPHPの記述の意味はほぼほぼ理解してもらえるかと思います。ちょこちょこ初めて見る記述がありますので、そちらの説明をおこなっていきます。
- <?php
- $cat = get_the_category();
- $cat_id = $cat[0]->cat_ID;
- $link = get_category_link($cat_id);
- ?>
- <a itemprop="item" href="<?php echo $link; ?>">
- ・
- </a>
まずはパンくずリスト内の記述です。上記のコードでカテゴリーページのURLが出力されます。手順としてはカテゴリー情報を取得した後に「<?php echo $link; ?>」でURLを出力しています。
- <?php if (have_posts()) : ?>
- ・
- ・
- ・
- <?php else : ?>
- <div class="entryContent">
- <p>記事が見つかりませんでした。</p>
- </div>
- <?php endif; ?>
次は記事の表示に関する記述です。サンプルブログでは「if文」の条件分岐を使って「記事がある時」と「記事がない時」の表示をそれぞれ設定しています。「・・・」の箇所には「記事がある時」の設定です。
「記事がない時」の設定が要らない場合は、上記のコードを削除してもらえばOKです。
- <?php the_content(); ?>
- <?php the_modified_date('Y.m.j'); ?>
記事の表示に関するコードも2点だけ紹介しておきます。「the_content()」で記事の本文を出力し、「the_modified_date(‘Y.m.j’)」で記事の更新日を出力します。
単純に記事を作成した日付を表示したい場合は「<?php the_date(); ?>」とします。
- <?php
- $args = array(
- 'post_type' => 'post',
- 'posts_per_page' => 6,
- 'orderby' => 'rand',
- 'post__not_in' => array(get_the_ID())
- );
- $the_query = new WP_Query($args);
- while ($the_query->have_posts()) : $the_query->the_post();
- ?>
- ・
- ・
- ・
- <?php endwhile; ?>
最後は「archive.php」でも紹介した「その他の記事」の部分にひとつ指定を追加していますのでご確認ください。追加したのは「’post__not_in’ => array(get_the_ID())」の1行のみです。
「その他の記事」という項目に現在見ている記事が並んでるのはおかしいですよね?ですから「’post__not_in’ => array(get_the_ID())」を追加して、「閲覧中の記事を除外」の指定を追加しています。
「single.php」も完成しましたので、記事ページのデザインを「style.css」に追加しましょう。この部分は是非ともご自身でデザインを変更していってもらいたいですね。
style.css
- ~テーマ情報省略~
- ~共通デザイン省略~
- ~main・パンくず・mainContents省略~
- ~ヘッダー・フッター省略~
- ~サイドバー・記事一覧・検索結果省略~
- ~エラーページ省略~
- ~その他の記事デザイン省略~
- /* ------ post ------ */
- #post {
- padding-bottom: 40px;
- background: #fff
- }
- #post #entryHeader figure a { display: block }
- #post #entryHeader ul {
- font-size: 0;
- padding: 0 20px;
- margin-top: 40px
- }
- #post #entryHeader li {
- font-size: 1.4rem;
- vertical-align: middle;
- position: relative;
- display: inline-block
- }
- #post #entryHeader li:first-child::after {
- content: "/";
- font-size: 1.4rem;
- margin: 0 10px
- }
- #post #entryHeader h1 {
- font-size: 3.2rem;
- font-weight: 300;
- padding: 0 20px;
- margin-top: 20px
- }
- #post .entryContent {
- font-size: 1.6rem;
- padding: 0 20px;
- margin-top: 40px
- }
- #post .entryContent p + p { margin-top: 20px }
- #post .entryContent h2 {
- color: #fff;
- font-size: 2.4rem;
- font-weight: 300;
- padding: 10px;
- margin: 40px 0;
- background: #ff657c;
- position: relative
- }
- #post .entryContent h2::before {
- content: '';
- width: 98%;
- height: 1px;
- background-image: linear-gradient(90deg,rgba(255,255,255,.7),rgba(255,255,255,.7) 60%,transparent 60%,transparent 100%);
- background-size: 10px 3px;
- position: absolute;
- top: 5px;
- left: 1%;
- z-index: 999
- }
- #post .entryContent h2::after {
- content: '';
- width: 98%;
- height: 1px;
- background-image: linear-gradient(90deg,rgba(255,255,255,.7),rgba(255,255,255,.7) 60%,transparent 60%,transparent 100%);
- background-size: 10px 3px;
- position: absolute;
- bottom: 5px;
- left: 1%;
- z-index: 999
- }
- #post .entryContent h3 {
- font-size: 2rem;
- font-weight: 300;
- padding: 10px 0 10px 20px;
- margin: 40px 0;
- border-left: 5px solid #ff657c
- }
- #post .entryContent img { margin: 40px 0 }
- #post .entryContent h2 + img,
- #post .entryContent h2 + a img,
- #post .entryContent h3 + img,
- #post .entryContent h3 + a img {
- margin: 0 0 40px
- }
- #post .entryContent a {
- color: #ff657c;
- text-decoration: underline
- }
- @media screen and (max-width: 768px) {
- #post #entryHeader h1 { font-size: 2.4rem }
- #post .entryContent h2 { font-size: 1.7rem }
- }
ココでは記事内の見出しデザインなどをご自身で設定してもらえたらと思います。今は見出しの「h2」タグと「h3」タグしかデザインを施していませんので、「h4」以降のタグも使われるならデザインを追加してください。
あらかじめ調整しているのは文字の「サイズ」「カラー」「太さ」、そして「余白」などです。
文字の装飾に関しては何も設定していないクリーンな状態です。なので「太文字」や「アンダーライン」や「マーカー」などが必要であれば、どんどんデザインを追加してみてください。
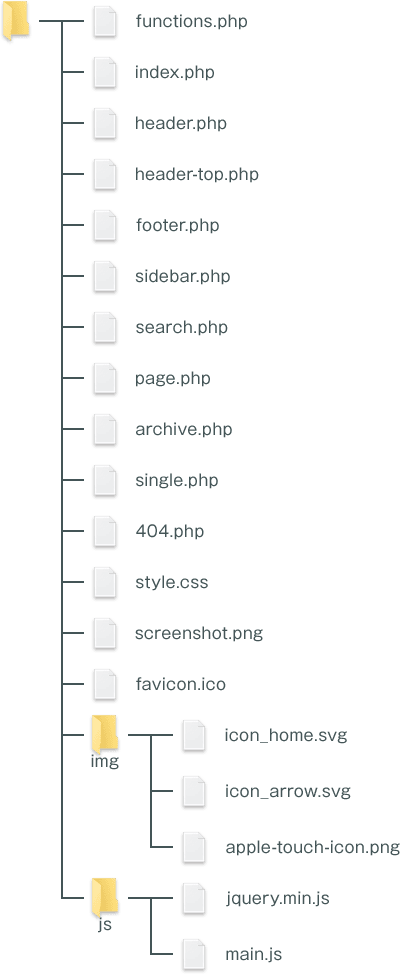
上記のようにファイルは用意できていますでしょうか。残すところPHPファイルはあとひとつとなりました。次に作成するサイトマップページで使用する「page-sitemap.php」が最後のひとつです。

電気工事士
SEO

サーバー・ドメイン
ボイラー技士

HTML

JavaScript/jQuery

資格・試験

サーバー・ドメイン

HTML
ホームページの簡単な作り方以外にも
お得な情報や日常を紹介するブログも是非どうぞ!Webに関連するレンタルサーバーなどの特徴・料金比較や、
個人的に挑戦している資格取得についての勉強法やグルメなどを紹介しています。


